Some companies require development teams to create Unified Model Language (UML) diagrams as part of the architectural process, before development begins. UML diagrams are blueprints of a system. They show components and their interaction in a visual way.
When a developer takes a specific task, they might need to read the diagram and translate the blueprints into code. Reading and writing UML diagrams is a useful skill to have.
Most universities teach UML as part of their curriculum. But if you’ve never worked with them before, the hardest part is understanding how they connect to your code.
I won’t go into too much theory. Wikipedia describes what UML is in a concise way and I couldn’t have explained it better:
“The Unified Modeling Language (UML) is a general-purpose, developmental modeling language in the field of software engineering that is intended to provide a standard way to visualize the design of a system.”
You can read the theory behind UML and class diagrams if you’d like to learn more. To see the practical part and how to create a diagram from an existing Swift code, continue reading.
Class Diagram
A class diagram describes the structure of a system by showing its classes, their attributes, methods, and their relationships. It’s one of the many diagrams of UML and a most common one.
Creating a class diagram could be an interview question. I’ve had to create it once myself. I got a design of a screen; it was a list with some data. I had to translate the design into a class diagram and then translate the diagram into code.
A class diagram can be as detailed as needed or as general as you’d like. It really depends on the requirement.
You’ll see how to create a simple class diagram given some Swift code with all the properties, methods, and their relationships.
It’s worth mentioning that there might be different class diagrams out there using different notations. While UML diagrams have certain set of rules and notations, developers aren’t really following it to the letter and that’s not the point of it. You can write it any way you’d like as long as it’s readable and understandable.
A class diagram has a class in its name but it doesn’t only show classes. It shows all objects in your code: structs, enums, protocols, classes and other.
In the diagram, an object is represented with a box divided into three parts:

- The top part contains the name of the class. It’s written in bold and centered, and the first letter is capitalized, just like any Swift
classorstruct. - The middle part has all the properties of the object. They are left-aligned and the first letter is lowercase.
- The bottom part contains the methods. They are also left-aligned and the first letter is lowercase.
Properties and methods are denoted with a sign that represents their visibility or access control.
Access control notations are as follows:
+Public-Private#Protected~Package
Creating a diagram from a struct
Consider the following Pet struct:
struct Pet: Identifiable {
  var id = UUID()
  let name: String
  let age: Int
  let owner: Owner
  let type: Animal
  let petInfo: PetInformation

  func feed() {
    if isHerbivore() {
      print("Feed with lettuce!")
    }
  }

  private func isHerbivore() -> Bool {
    return type.herbivore
  }
}
It has a few properties describing the object and two methods, one of which is private. It also has an id of type UUID and conforms to Identifiable protocol.
I’m using draw.io to create the class diagram and it’s a simple free website that lets you create UML diagrams and then export them into any format you’d like. There are other websites, like Lucidchart, which is widely used by companies. It has a free tier but requires an account.
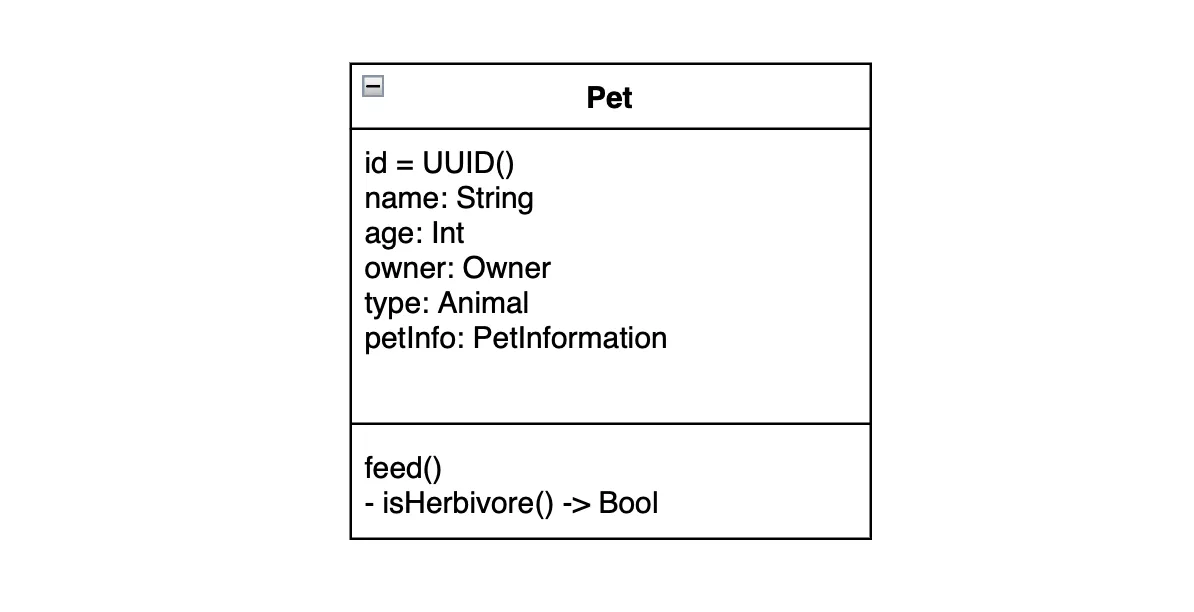
This is how the class diagram of a Pet looks like:

The default access control for Swift types is internal and there’s no notation in UML for that specific access control type. Most developers omit the access control for it or make up their own sign. isHerbivore() is marked with - as a private method.
Adding protocols and implementation relationships
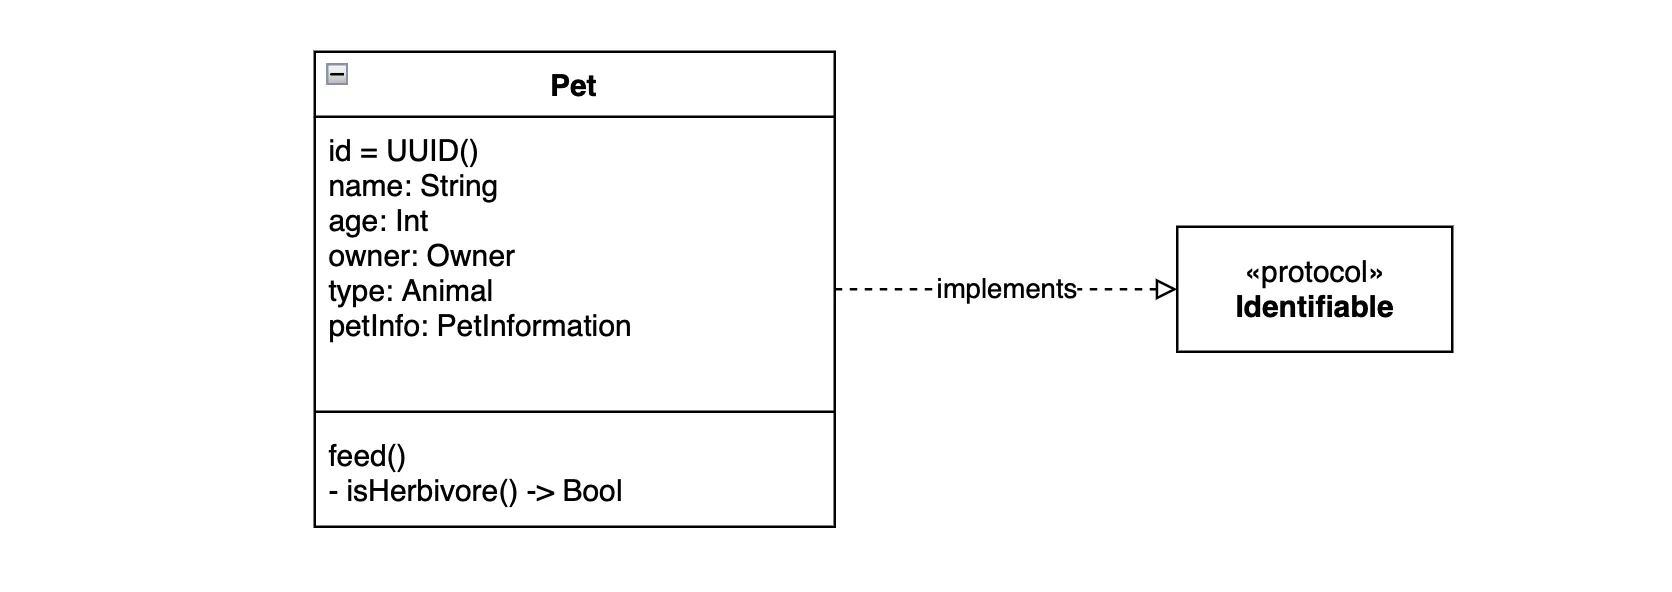
Pet conforms to Identifiable so it can implement the unique identifier. To show this type of relationship in your diagram, create a diagram with a single box for the protocol and add the relationship:

An implementation relationship is a relationship between two models, in which one model implements the behavior that the other model specifies. It’s used for protocol conformance. The graphical representation of the relationship is a dashed line with an empty triangle arrow pointing towards the protocol.
For default protocols you don’t need to add any properties or methods on the protocol diagram, only its name in bold and the <<protocol>> notation. For custom protocols, you can decide whether you want to add the properties and methods that your protocol defines.
Adding other models and their relationships
The rest of the code defining our models:
struct Owner: Experienced {
  let name: String

  func isExperienced() {
    print("Maybe")
  }
}

protocol Experienced {
  func isExperienced()
}

struct Animal {
  let type: String
  let breed: String
  let herbivore: Bool
}

struct PetInformation {
  let traits: [String]
  let vaccines: [Vaccine]
}

struct Vaccine {
  let name: String
  let type: String
}
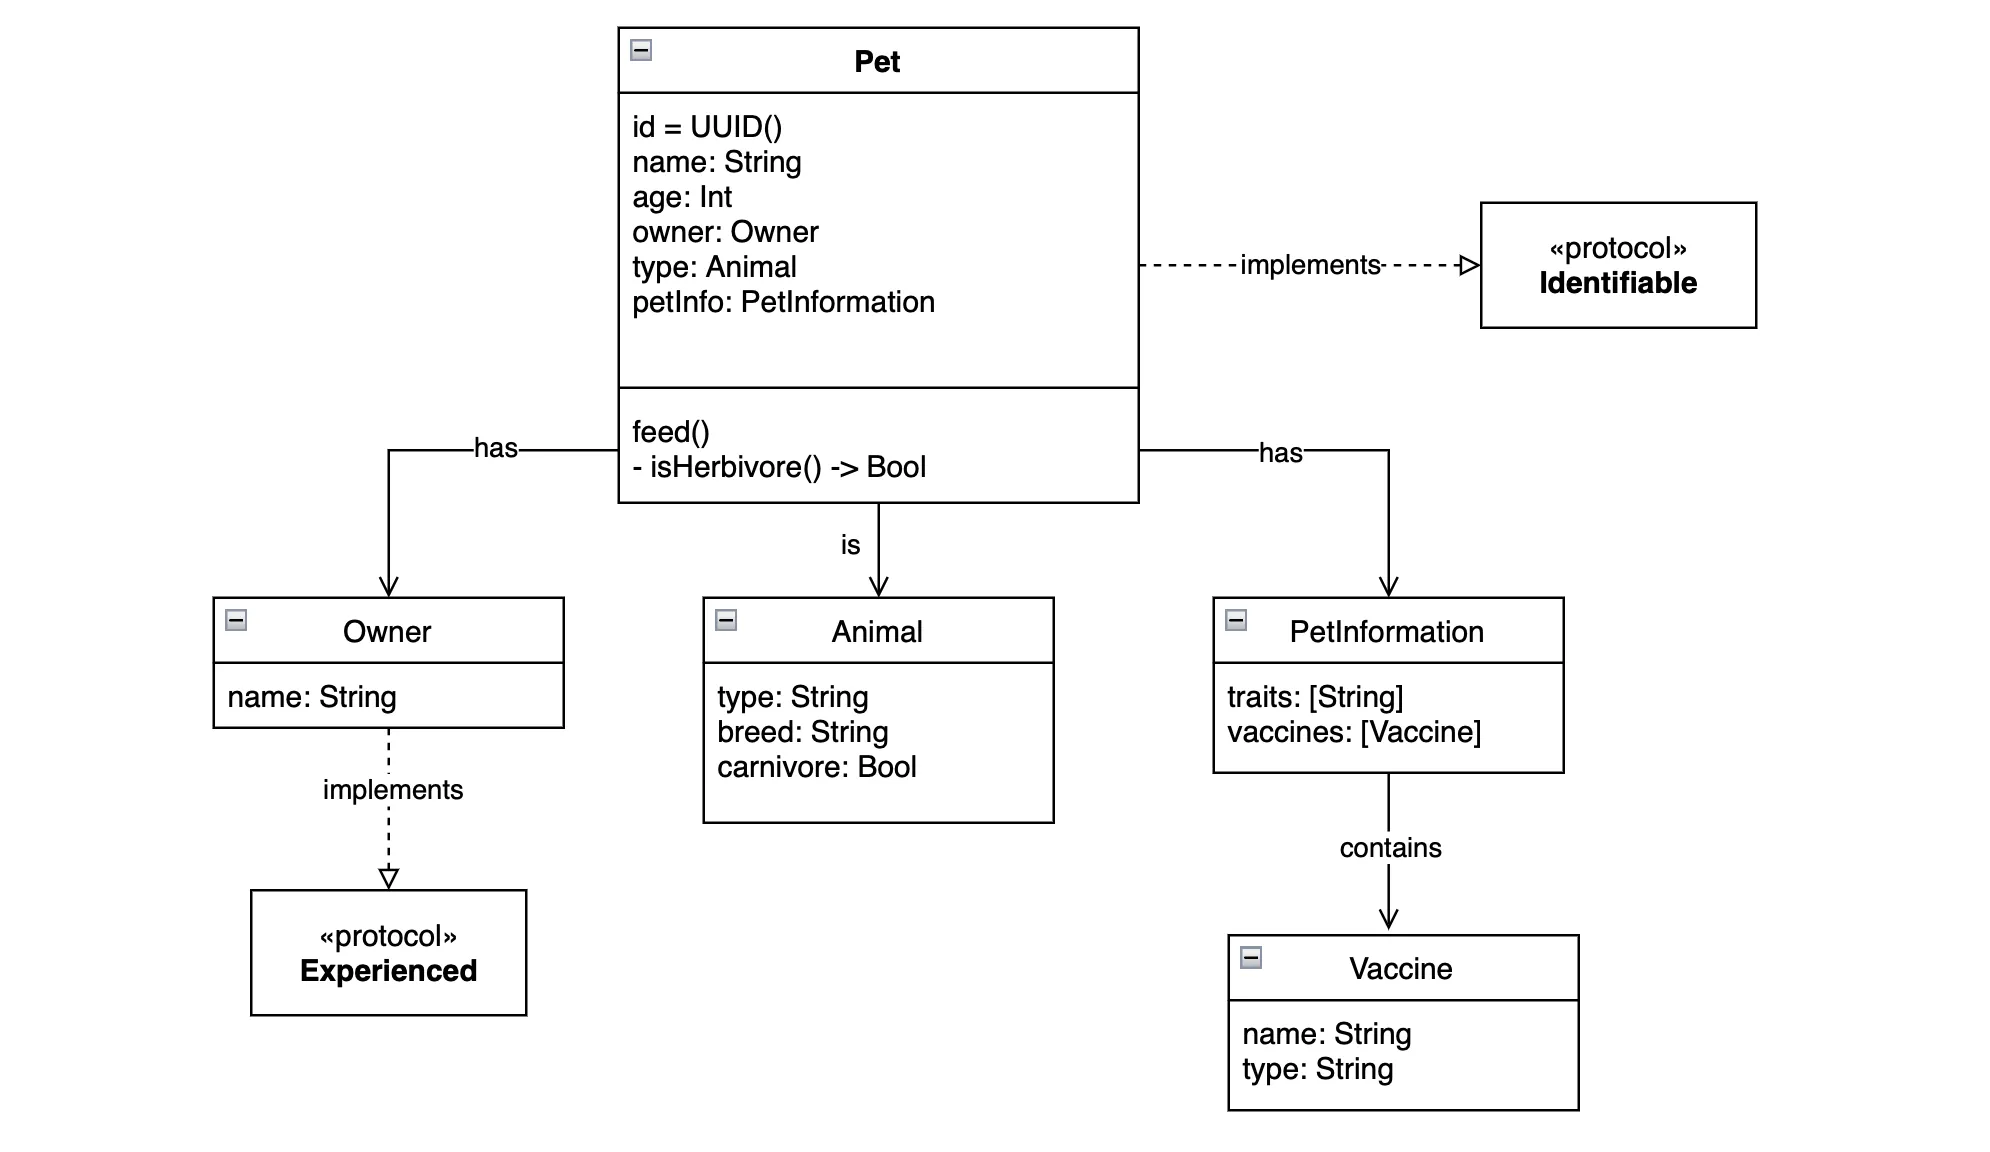
And the class diagram looks like this:

The solid line with an open arrow pointing towards the class that supplies the property is a graphical representation of an association relationship and is used to link any number of classes.
The text on the relationship arrows is optional and is not required. But it can sometimes be very useful.
This is how the basic class diagram looks like from the given code. You should also be able to write the code given the class diagram, following the same principles. There are a few notations and relationship to learn that keep repeating all the time. Once you’ve learned them, you’ll be able to create any class diagram for a system.
What about a ViewModel?
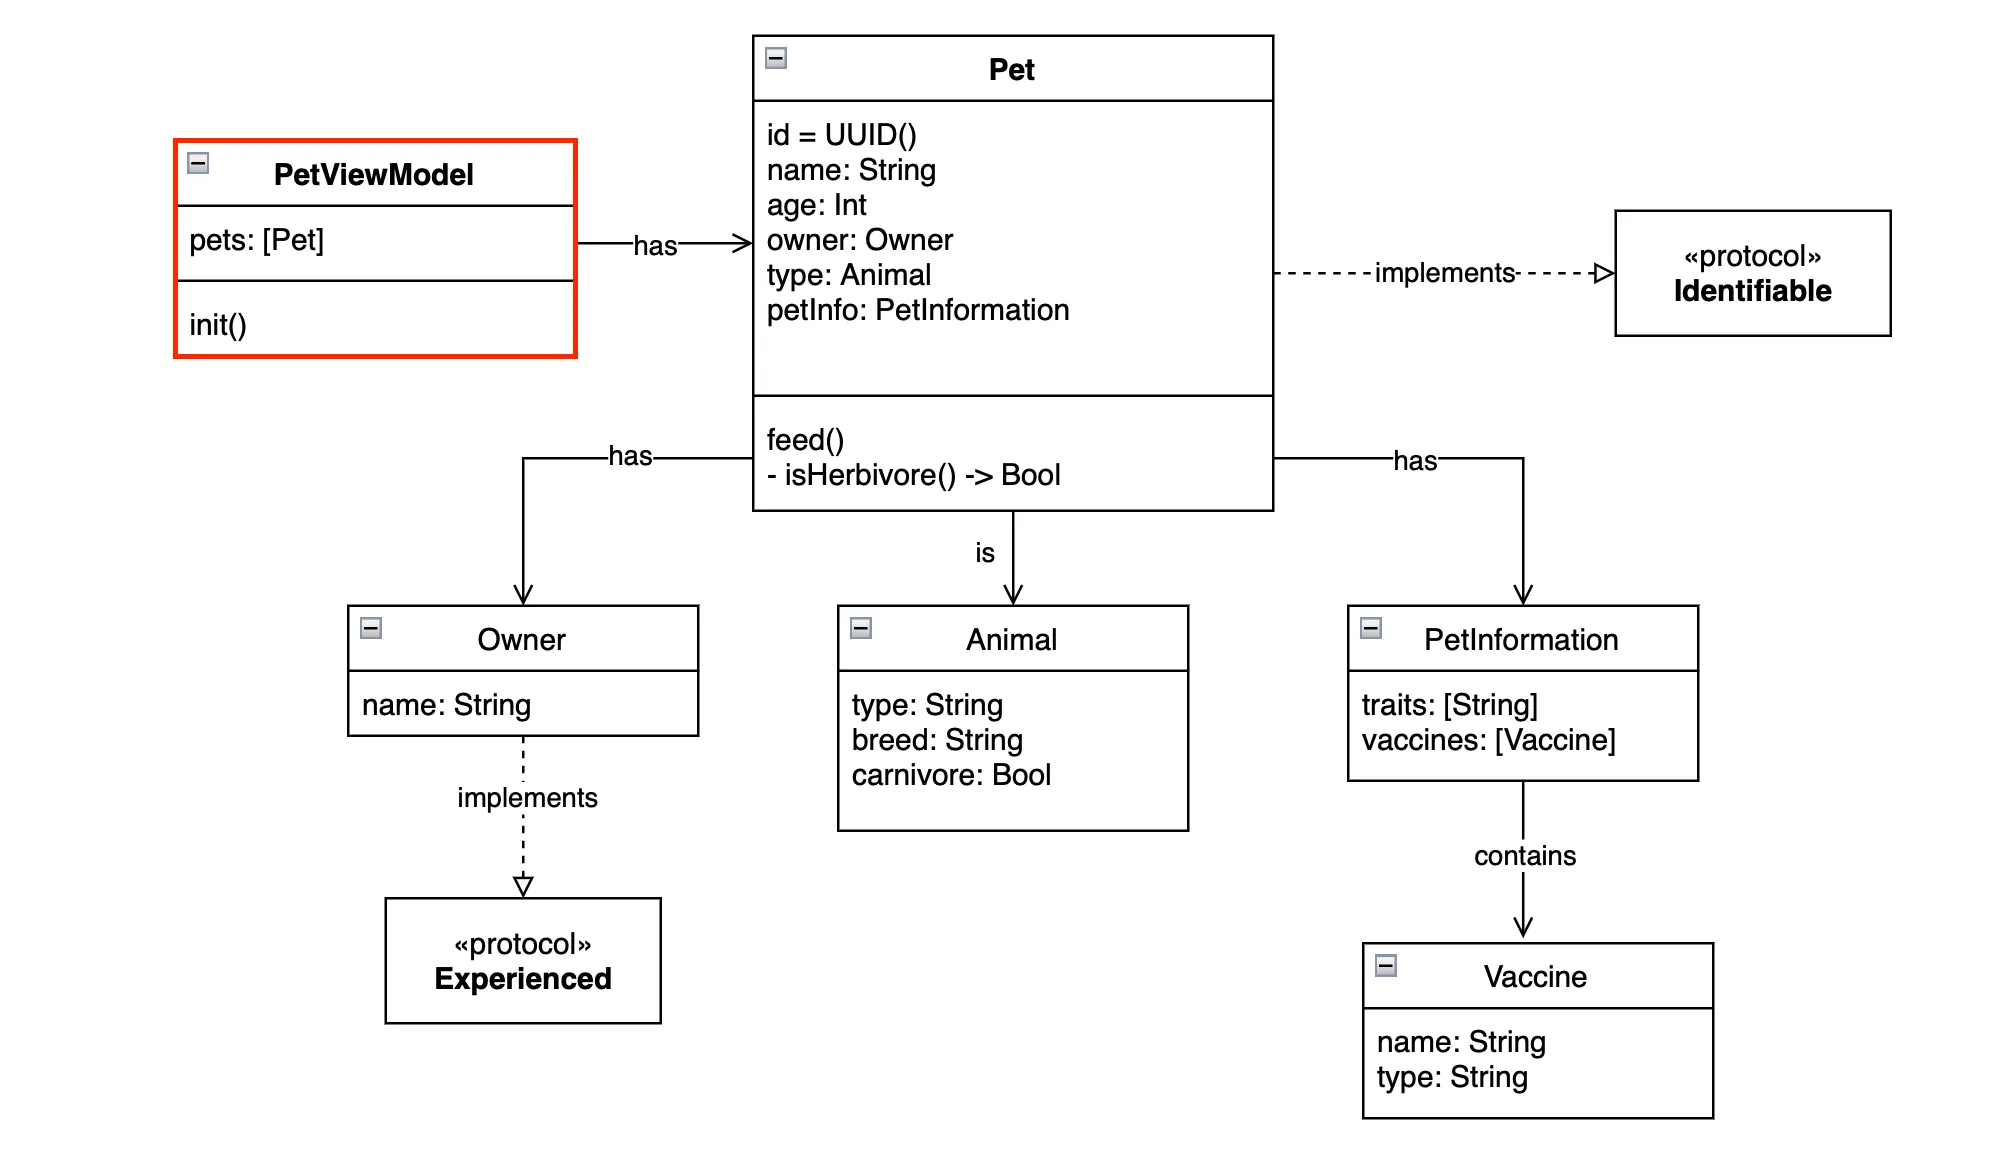
A ViewModel is a class that you can add as a diagram like any other diagram you’ve added. Let’s say you have a PetViewModel with pets property and an initializer. Your class diagram would now look like the following:

Final Thoughts
Class diagrams are common in programming and it’s worth knowing how to create and read them. It’s one of the overlooked skills that might give you an advantage knowing how it works.
This is not the ultimate guide on how to create UML or class diagrams, but it should be enough to get you started on your own.
Please feel free to reach out on Twitter if you have any questions, comments, or feedback.
Thank you for reading and happy coding!
